Mit einem Blumengruß aus Papier Danke sagen!!
Heute möchte ich dir zeigen, wie du schnell und einfach einen Blumengruß oder eine Dankeskarte gestalten kannst.
Today I would like to show you how you can quickly and easily create a flower greeting or a thank you card.
Mit dieser Karte nehme ich am International Blog Highlights von Kylie Bertucci einer australische Demonstratorin teil. Diesen Monat sind es 38 Teilnehmer, wenn dir meine Karte gefällt, klicke auf das Bild und du kommst zur Abstimmungsseite.
With this card I am participating in the International Blog Highlights by Kylie Bertucci, an Australian demonstrator. This month there are 38 participants, if you like my card, click on the image to go to the voting page.
Produktpaket Blumengruß / Blossoms in Bloom Bundle

Das Motiv der Karte ist mit den beiden großen Stanzformen aus dem Set in nur drei Arbeitsschritten gebastelt. Die beiden Blumenmotive werden in zwei unterschiedlichen Farben ausgestanzt (Merlotrot und Papaya) und einfach aufeinander geklebt (siehe Tipp).
The motif of the card is created in only three steps with the two large cutting dies. Punch out the both flower motifs in two different colours (merry merlot and papaya) and simply glue them together (see tip).
Den Hintergrund habe ich im Ombee-Effekt gestaltet und dazu die Blending-Pinsel verwendet. Dafür nimmst du Farbe (Merlotrot) mit dem Pinsel auf und beginnst von unten über den Farbkarton Grundweiß zu wischen. Den Vorgang wiederholst du so oft, bis dir das Ergebnis gefällt – unten dunkel und nach oben immer heller.
I created the background in the Ombee effect band used the blending brush for this. To do this, pick up the colour (merlot red) with the brush and start blending from the bottom onto the basic white colour cardstock. Repeat the process until you like the result – dark at the bottom and and lighter and lighter towards the top.
Beides wird auf die Grundkarte (10,5 cm x 29,7 cm) geklebt, mit einem Spruch versehen und fertig ist die Karte.
Glue both onto the basic card (10.5 cm x 29.7 cm), add a saying and the card is ready.
Tipp / Tip:
Klebe vor dem Ausstanzen der filigranen Blume ein Stück des Klebebogen auf die Rückseite des Farbkartons (Merlotrot) und stanze es mit der Stanz- und Prägemaschine aus. Die Schutzfolie lässt sich jetzt leicht lösen und das Zusammenkleben der beiden Blumen ist kinderleicht, ohne klebrige Finger 😍.
Before punching out the more delicate flower, adhere a piece of the adhesive sheet to the back of the colour card (Merry Merlot) and run it though the Stampin’ Cut & Emboss Machine. So that gluing the two flowers together is child’s play, without sticky fingers😍.
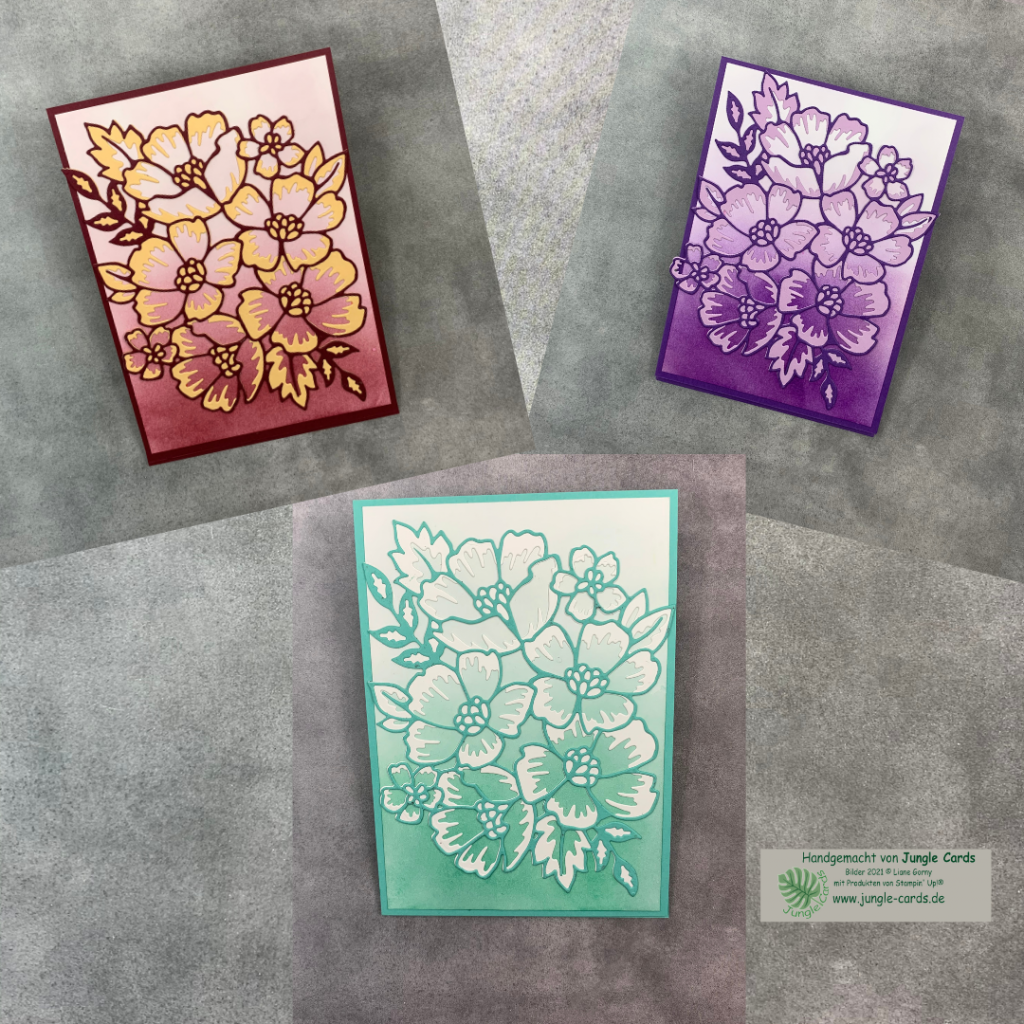
Da ich gerade im Flow war, zeige ich dir noch zwei andere Farbkombinationen: Fresienlila mit Amethyst und Grundweis mit Jade.
Since I was in the flow, I’ll show you two other colour combinations: Fresh Freesia with Gorgeouse Grape and Basic White with Coastal Cabana.
Aufstellkarte / Fun Fuld Card
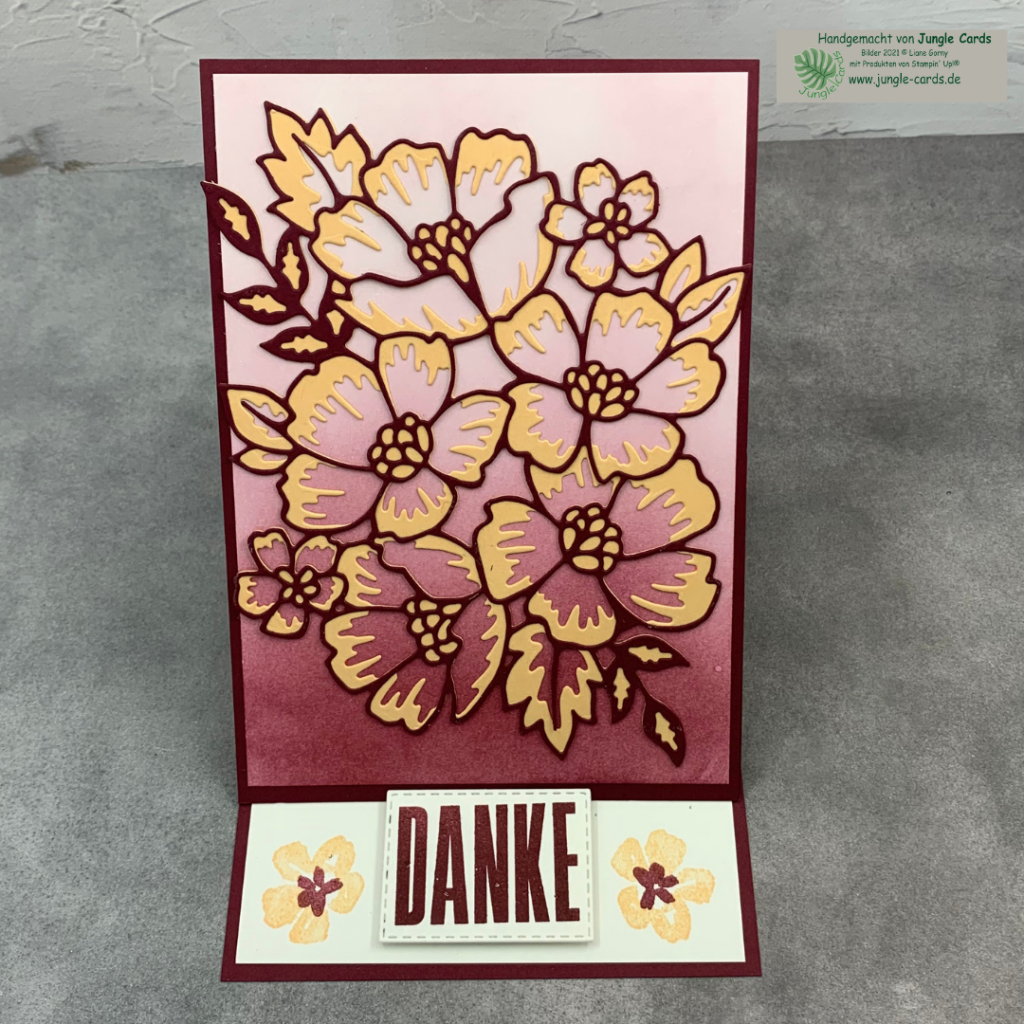
Ich liebe besondere Kartenformate und so entstand diese Aufstellkarte für meinen Auflieger. Dazu wird die vorhandene Grundkarte bei 14,85 cm und 7,4 cm gefalzt. Für das Blumenmotiv benötigst du einen zusätzlichen Auflieger in Merlotrot (10,5 cm x 14,85 cm), welcher nur im unteren Bereich der Grundkarte (7,4 cm) aufgeklebt wird. Außerdem wird ein „Stopper“ benötigt, damit der Auflieger aufgestellt werden kann. Dazu habe ich das „DANKE“ mit den bestickten Rechtecken ausgestanzt und es mit Dimensionals auf den Einleger befestigt. Eine weitere Projektidee mit dem Produktpaket Blumengruß findest du hier *klick*.
I love special card formats and so I created a Fun Fold Card. The existing basic card is scored at 14.85 cm and 7.4 cm. For the flower motif, an additional layer in Merry Merlot (10.5 cm x 14.85 cm) is needed, which is only glued in the lower area of the basic card (7.4 cm). A „stopper“ is also needed so that the layer can be set up. For this, I punched out the „THANK YOU“ with the stitched rectangles and attached it to the layer with dimensionals. Another project idea with the Blossoms in Bloom Bundle can be found here *click*.
Folgende Produkte/Materialien von Stampin‘ Up! habe ich verwendet:
Farbkarton: Grundweiß, Merlotrot, Papaya
Stempelkissen: Merlotrot, Papaya
Stempelsets: Blumengruß, Große Wünsche
Stanzform: Blumenzierde, bestickte Rechtecke
Plending-Pinsel, Dimensionals, Klebebögen
Meine Materialliste findest du hier *klick*
card stock: Basic White, Merry Merlot, Papaya
Stempelkissen: Merry Merlot, Papaya
Stempelsets: Blossoms inBloom, Great Wishes
Stanzform: Many Layered Blossoms, Stitched Rectangles
Blending Brushes, Dimensionals, Adhesive Sheets
You can find my material list here *click*.
Wenn dir meine Karte gefällt, dann gib mir bitte ein Herzchen in der rechten oberen Ecke❤️ Hier kommst du zur Abstimmung (Bild Nr. 21). Eine Woche lang kannst du für die eingereichten Karten abstimmen.
If you liked my card, please give me a heart in the upper right corner❤️ You can vote for my card here (No. 21. / You can vote for the submitted cards for one week.
Vielen lieben Dank für deine Unterstützung.
Thank you very much for your support
Liebe Grüße / Kind regards
Liane
6 Replies to “Mit einem Blumengruß aus Papier Danke sagen!!”
Great cards!
Großartig diese Vielfalt! Und tolles neues Layout deiner Seite!
Ich wünsch uns Glück Stempelschwester! 😉
Liebe Grüße Simone
Very pretty card! 🙂
This is a beautiful card, Liane!
Love these cards ! I love monochromatic colours so these spoke to me. Beautiful ombré. Love this fold too?
Stunning in each colour! Thanks Liane for being part of my International Highlights this month! All the best with the voting.